Tuesday 22 December 2015

Merry Christmas - My Favorite Christmas Cake

"It's the most wonderful time of the year"....

Yeyyy... Christmas is here... the year is going to end with a happy note for me and I wish for all of my friends, too. In this festive season, how can I stop myself from baking more and more cakes... No I could not...

Actually in last few months I shifted to my new apartment and I took some time to organize everything, particularly the kitchen - because that is one of my favorite places at my home. But baking was on - with 2 school-going kids, I really cannot afford to stop baking. As I said earlier, I always prefer to slide in a slice of home-baked cake instead of the store-bought ones. So, I have my stock full now to share with you - more recipes, more cakes and more stories...

This time, I am back with a bang... And that is the easiest Christmas Cake recipe with dry fruits. I can tell you, this is going to be a show-stopper for sure.


Wednesday 19 August 2015

Choco Chips Cup Cakes - a Favorite for All!

When I am not in mood for a long baking project, I bake cup cakes! And when I don't have enough time to write a long blog, I write on these cup cakes projects!!! LOL...


So here is a simple and quick cup cakes, which I have baked quite some time back. This is not a latest bake, so I have only 2 pics to share with you all. Next time, I bake this choco chips cup cakes - I'll surely take step-by-step pics for you - I promise.

Thursday 13 August 2015

A Chocolate Cake with Bournville Dark Chocolate Ganache!

I am back with my favorite chocolate cake recipe - actually this is the only flavor for any type of dessert, which attracts me most. Since I am not a dessert-person, I prefer those which are less sugary or have little bit of bitterness as of dark chocolate. Chocolate is favorite among all generations - be it senior members of the family or the junior ones. So, baking a chocolate cake is the safest way to serve dessert for any family dinner party.


The most versatile thing about a chocolate cake is that no matter what icing or frosting you put to decorate the cake - even if it falls apart, the cake will be praised by everyone. You can keep the decoration part minimal or even no-icing - does it really matter! No - the universal flavor and taste of chocolate will be the ultimate winner.

Monday 10 August 2015

My First Red Velvet Cake!

An attempt to a red velvet cake needs some confidence in baking. I am definitely not that confident in baking and I always believe that I've so many things to learn and practice. So, I was not at all sure whether this project will come out successful or not. Actually, I kept this one pending for quite a long time. As I have mentioned many times in my blog, that my daughters are my best source of inspiration. They would always encourage me to take the next plunge in my life - no matter whether it's the baking project or something more serious decision. So this time also, the same situation occurred. They just pushed me into baking a red velvet cake and I made it! Although the process is little elaborate and you will need a variety of ingredients - but the red velvetty texture of the cake and the melting-in-mouth taste will make your job less painful and you will be in heaven at your first bite of the cake. The appreciation you get, once you present it on the dining table - is absolutely priceless.


Wednesday 5 August 2015

Mango Cheese Cake - A Perfect Summer Dessert

I love cheese cakes... period!!!

I am not a sweet-person, but the slight tangy taste of cheese mixed with sweet and flavored with your preferred choice - makes me drool... literally! Successfully baking a cheese cake is my dream baking project and I am yet to achieve that. In my baking experience, till today, I've baked only one cheese cake and that came out pretty well though. I have few snaps of that chocolate cheese cake - will make another post with those. But this one, is not a baked one - I am sure it is the quickest and easiest way to prepare cheese cake at home - by using the ready-made cheese cake product.


Sunday 2 August 2015

Cashew Topped Choco Cup Cakes

Here is another easy version of cupcakes, which I am sure, everyone will like - especially the kids. These choco cup cakes are best to serve as afternoon snacks. If you have some whipped cream in your stock then you can turn these cup cakes to single serving dessert, too. However, my soul intention of baking cup cakes, is to use them as the first break snacks for my kids. 


These days, many of the schools give multiple breaks for their students. In my kids' school, they have one short and one long break. It is really a time consuming task every morning, to prepare snacks or lunch for every break. So, if you bake these cup cakes in batches over the weekend, then the short break food is taken care of. Now you are in a little better situation in every weekday morning, as you don't have to prepare food for multiple breaks.

This is an easy one, as I have mentioned before. Only additional ingredient you will need is some amount of cashew nuts. If you don't have cashew nuts, then you can use almonds or even pea nuts. Any nuts will give the crunchy texture to these cup cakes, which the kids mainly love. Instead of nuts, you can use chocolate chips, as well. 

My stock of cashew-nuts, which I got from my last trip to Goa, was almost finishing. So, I made use of the last handful of cashew-nuts in this baking project. You will need around 1/2 cup of cashew nuts. Soak them in water for couple of hours and they are easy to cut or slit. Other than this, the basic recipe is same to the one I used here - Simplest Chocolate Cake and more! (Click the highlighted link to get the batter recipe)

Prepare the batter as mentioned in the recipe. Put your oven to preheat at 180C. Sprinkle some flour on the soaked cashew nuts to give a thin coating of flour. Add 1/2 of the cashew nuts into the batter and keep the rest for the top. This amount of batter will give you around 10-12 cup cakes. Place the cup cake liners on the cup cake moulds and fill them 3/4th, with the batter. If your oven is ready then put the cup cake pan inside the oven and let it bake for 15-20 mins at 180C. Never put cup cakes inside the oven for longer period of time, as it will get hard and might burn, as well.

I have made this batch of cup cakes for my friends, so I had wrapped them in cling wrap to keep the moistness intact. This way you can keep your cup cakes fresh for the whole week.

I have something more interesting coming up in my next blogs. So keep waiting... till then happy baking!!


Wednesday 8 July 2015

Cherry and Cashew Topped Vanilla Cake

Hi friends!

I am getting little irregular in posting, as I am going through a terribly busy schedule... but can't help really... everything is part of life! However, this does not mean that I have stopped my baking projects. My weekend baking spree is still on... and in this gap, I have already gathered enough stock for couple of my next posts. One of these, is this one - Cherry and Cashew Topped Vanilla Cake.

This is a complete tea-time cake or good for your between-the-meals snack craving. You can also use this as breakfast by topping with your favorite jam or jelly. Obviously this type of no-icing cakes are best for your kids lunchbox and most of the time, I prefer to bake these ones. On the health-side, this one is better, as it does not have any creamy icing on top. But, this is definitely not a dessert cake. 

These days, whenever I visit my friends or relatives place, I make it a point to bake for them. I believe, a home-baked fresh cake is much, much better than the store-bought ones - because, it has this personal touch, which is simply priceless! And I have seen, all my close friends and relatives - they do enjoy to have a freshly baked cake from me - that really gives me extreme pleasure. So, this cake was baked with the same intention. I specifically avoided an iced-cake, as I had to carry this for long distance. 

I did not have much time to shop for the ingredients, so I decided upon this cake, as everything was available in my stock. The cashews were brought from Goa, and I wanted to use these cashews, in various ways - not only in cake, but also in other recipes. But, before I could make extensive use of the cashews, the pack was about to get finished all of a sudden. People, at my home, were lavishly snacking just on cashews. So, I grabbed the last part of it and could use only in few of my cakes... :) The cherries which I had in stock, was dried type. So, I soaked these cherries in a cup of warm water for couple of hours, and they were ready to use.

The process is very simple. The batter was similar, as of the Basic Vanilla Cake. I took, 1/2 cup of cherries and 1/2 cup of cashews. Sprinkled some flour on top and then 3/4th part of this mix, was added to the batter. The rest of the cherries and cashews were placed on top of the batter, after pouring it into the greased pan. Pre-heated the oven at 160C and baked the cake for 30-35 minutes.

Once the cake was ready, I left it in the cake pan itself, to cool down at room temperature. Then wrapped with cling wrap for carrying the cake through long distance driving.


Happy baking, friends...

Wednesday 10 June 2015

Coconutty Strawberry Cup Cakes and a Bleeding Heart!!!

Cupcakes are the first love of my kids... why only kids, I think, everyone loves to eat cupcakes! The cute and simple look of the cupcakes, the varied flavors and the easy-to-make nature -  all these have made the cupcakes so popular, I guess! 

All my baking projects are done in my microwave - and for the cupcake projects, I do really feel the need of an OTG. Because, in a microwave you cannot bake more than 8 cupcakes at a time. And 8 is not at all a considerable count, when it comes to cupcakes... you know, what I mean! So, I have bought another set of 8 cupcake moulds, which make it 16... at least this count of cupcakes will last for couple of days for my family. 

This strawberry cupcake recipe is so unique, probably you've never tasted it. The regular cake shops generally don't keep cupcakes, even if they do - you'll not get this one, I am sure. So the only way to taste this super-simple strawberry cupcakes, is to make them at home. 

I have learnt this recipe from my baking guru, Lynette. During the fondant class, she wanted to treat us with something unique, as the after-class snacks and then she brought these lovey-dovey cutey-cutey cupcakes. We were simply amazed to see her skill - these cupcakes were absolute delicacy and yet so simple to make. Perhaps that's the mastery of any art, which teaches you to make elegant yet simple art pieces - and baking is an art!!!

Coming back to the recipe - prepare the cupcake batter - it will be a simple vanilla batter which I've mentioned earlier in my blog - The Basic Vanilla Cake. Additionally for the decoration purpose you will need -

Strawberry Crush - 2 cups
Water - 4 cups
Desiccated Coconut - 2 cups

Preheat your oven at 160C. Do not put cupcake liners on the cupcake moulds. Butter the cupcake moulds nicely and then pour the batter into the moulds. The moulds should be only 3/4th part filled with the batter, as you need to keep some space for the cupcakes to increase in size while baking. Place the moulds inside the preheated oven and bake for 15-20 mins at 160C. Bring out of the oven and carefully remove the moulds. Place the cupcakes on a flat plate or sheet and allow them to cool at room temperature.

In a big bowl, mix the strawberry crush with water. 

Spread the desiccated coconut in another large plate. 

Take each cupcake, dip them in liquid strawberry crush for a minute or so and then immediately, roll over the desiccated coconut. Spread some amount of coconut on top too. Do this for all the cupcakes. As a final decoration, spread 1 teaspoon of strawberry crush on top. As an alternate, you can put 1 fresh strawberry slice on top. Allow the cupcakes to chill inside refrigerator for at least 4-5 hours before serving.

I had made only 16 cupcakes, so I had some extra batter. I decided to make another heart-shaped cake with that. 

And here is what came out from the microwave.

Again sprinkled the desiccated coconut on top and drizzled some amount of strawberry crush... which ultimately looked like a bleeding heart!!! Huh....

Happy baking! See you again!!! :)

Thursday 21 May 2015

Fresh Strawberry Vanilla Cake

Hello friends!!!

Off late I am getting irregular with my posts and I am extremely sorry for that... Couple of family get-together and then my elder daughters results were out this Monday... so I was quite busy during this time. But that could not stop my weekend baking projects - I made few easier projects of cupcakes in last few weekends. Those will appear in my next posting - images are queuing up to be watermarked... so I am back with a bang, you can say!!


So let me pick up from where I was in my previous blog - A Vanilla Sponge Cake. I used a vanilla sponge cake to prepare this fresh strawberry cake. My baking guru - Lynette, shared few tips and after applying those tips it came out quite well. But, I won't say I was super successful in this project. After assembling the cake, I kept it in refrigerator for over-night and the next day I carried it to my brother-in-law's place, which is in 40-45 mins distance from my house. The car a/c was put on High and my hubby tried his best to give the cake a smooth ride - but still the cake got little soggy and the fresh cream icing was almost going to slide from the cake. The cake was immediately put into refrigerator. but it didn't come back to its previous shape. Here is a lesson learnt for me and for all of you - that don't carry a fresh cream cake for long distance, and even if you do, you should have proper logistics.

Here are the items you will need to prepare this cake -

Blueberry whipping powder - 2 packs
Fresh strawberries - 1 cup, vertically sliced
Strawberry crush - 1/2 cup
Light sugar syrup - 1/2 cup (add 2 tablespoon of sugar in 1 cup of water, boil and cool down at room temperature)

Step 1:
Slice the cake horizontally in 2 parts and evenly soak the bottom layer with some amount of sugar syrup. This will make the cake moist.

Step 2:
Spread 1/2 part of whipped cream on top of the bottom layer. Sprinkle 1-2 tablespoons of strawberry crush on top of the cream filling. You can also add few strawberry pieces into it.

Step 3:
Place the other half of the cake on top of the filling. Soak the top portion with remaining sugar syrup and then cover the top part with whipped icing.

Step 4:
Place the strawberry pieces on top of the icing in a nice way. If you want you can make designs with it too. Also add few pieces on the sides.

Step 5:
Put little amount of strawberry crush on top of the strawberry pieces to keep the strawberries fresh and moist.

Step 6:
After assembling, refrigerate the cake for over-night, so that everything is nicely set.


Monday 27 April 2015

A Vanilla Sponge Cake without Oil/Butter

Hi friends!

I am back after 2 weeks of hibernation!!! In this 2 weeks, I went for a short vacation to Goa and enjoyed to the fullest with my family. It is a place of beautiful scenic locations, good food, warm and caring people and unlimited shopping! So, I would recommend this place to all of you.

Anyway, back to my topic! This is not a travel blog - but may be I should soon open one travel blog too, to share my travelling experience with all of you. :)

There are several recipes pending to share with you. Today, I am going to talk about one of my latest bakes - a fresh strawberry cake! This one I baked for my sister's birthday and it came out quite well. But there were few issues, which I experienced while working on this cake. I'll share those too, later on. Let me first begin with the vanilla sponge cake.

This fresh strawberry cake I prepared using a vanilla sponge cake and it was made without oil or butter. When I put a lot of icing on top of the cake, I try to balance the fat-quantity by making the cake fat-free. You have to keep a track of the health quotient too, while preparing the desserts. A sponge cake is also light in weight, so it does not give you that heavy feeling after eating.

It is very easy to prepare this basic cake. You will need only few ingredients.

The dry ingredients are -
Flour or maida - 1 cup minus 1 tablespoon
Powdered sugar - 1 cup minus 1 tablespoon
Baking powder - 1 teaspoon

The wet ingredients are -
Eggs - 4 large
Hot water - 1 1/2 tablespoon
Vanilla essence - 1 1/2 tablespoon

The process is very much similar to the chocolate sponge cake recipe. Please note that you should be very careful in measuring the items.

In a large bowl, sieve in flour and baking powder. Blend well and keep aside.

Break the eggs and separate the white and yellow parts in 2 different bowls. The white part should be kept in a large bowl.

Use the electric beater to beat the egg white until stiff peaks arise. Gradually add sugar by couple of tablespoons at a time and keep on beating. Once all the sugar is used, add the egg yolks and again beat for some time. Next add the vanilla essence and mix well.

Now gradually add boiling water in few drops and beat well. Now the mixture will be light, fluffy and almost 3 times in volume.

This is the time to set your oven in preheat mode (180C). Also prepare your cake pan by greasing and dusting.

Slowly fold in flour into the egg mixture. While doing this, don't add all the flour at a time. Sprinkle in small amount on top of the batter and fold in nicely.

Pour the batter in the pan and place inside oven to bake at 180C for 30-35 minutes.

The cake will leave the side of the pan, when it is done. Also the top will spring back when you touch on top. Insert a knife to check the doneness and if ready, then remove from oven.


Allow it to cool down at room temperature and then bring out the cake from the pan. Wrap the cake with a cling wrap and place inside refrigerator for future use.

In my next blog, I'll share the fresh strawberry cake making procedure using this vanilla cake.

Till then, ciao!

Thursday 9 April 2015

Fun with Fondant - A Weekend Spent Well!!

Today I am not going to describe any cake recipe or baking tips. It's going to be a colorful post, with lots of bright and beautiful images. Yes, you have guessed it right - it's the fondant decoration for the cakes.

As I have mentioned many times, that I am still learning. Many of you are getting inspired from my blog and started baking for the first time - that is really a great achievement for me. When I started this blog, I never knew - it will be popular and more than that, inspirational - for so many of you. I am so, so happy that at least it is serving a purpose!

So, back to my story! I never had any experience of using fondant in decorating cakes, but I have seen many of the expert bakers are using this technique and they are making so exquisite cakes... just unbelievable! Being a member of the Home Bakers Group Pune (in Facebook), I got the opportunity to see this beautiful art pieces - they are not just cake, but something more than that. In fact, I cannot think of cutting these cakes to serve - they should be kept for display, forever in some museum! That's my idea of using fondant.

Anyway, I was planning to join some course to learn some basic technique of using fondant and I got my chance. One of the best and renowned home-bakers of Pune - Lynette Dias, was conducting this class for 2 days over the weekend. Weekend was the best time for me, so I decided to join the course. I was like - no matter whatever the situation is - I am going to do it! And I took the right decision. It was such a great experience to learn so many new things and moreover it was fun to spend a weekend out of the daily chores of work-cook-sleep. It was a real stress buster for me. We were 4 ladies in the group - and all of us felt like we have gone back to our childhood days to play with colorful play-doughs.

Making a Tiger
Yes, the process of creating these beautiful, cute, little figurines using the colored fondants are exactly same as playing with play-doughs. If you have done that in your childhood time, then you are going to be a pro in some time. But obviously you have to rack your brains, to get all these unique themes of decorating cakes.

The Tiger and The Lion
We did few figurines on wild animals and then we moved to our project cakes. Our teacher, Lynette - gave us few options for the project cakes and among that I selected the mermaid cake. Actually the day before, I was thinking that if there is an option then I'll go for a mermaid cake or a family cake  - showing a couple and two daughters. However, the family theme could have been more difficult, because preparing the mermaid was almost a 2 hours job. By the end of the first day, we were ready with most of the figurines.

A Teddy Bear and A Cute Doggy

The Mermaid

The second day was kept for icing the cake with ganache, covering with fondant and placing the figurines. Basically the total assembling of the cake was done in the second day. In second day, I had prepared few more aquatic items like octopus, a big fish and sea weeds. Ultimately the cake was assembled and it was really looking so gorgeous. Everyone's cakes were looking brilliant and gorgeous. Without Lynette's guidance, it was completely impossible. Thank you so much, Lynette!

My Mermaid Cake

Octopus and The Big Fish

I brought my project cake back home and my family-members could not believe that I made that cake. I had to cut that cake, but I made sure to remove these cute-little figurines first. These are still lying in my refrigerator and I don't think, I'll ever be able to throw them up in kitchen garbage-bin... I'll store them as long as I can... :)

Friday 3 April 2015

A Black Forest Cake and a Surprise!!!

It was the birthday of my younger daughter and I wanted to make it special. I rarely get birthday cakes from outside - for every birthday in my family, I make sure to bake a cake. The first time, I started this, was the 5th birthday for my younger daughter. But that was a steamed cake, made in pressure cooker. At that time, I did not have a microwave, so I found a ready-made cake mix, which can be made using a pressure cooker. The process was not at all proper baking, and how come you can call it a cake, which is not baked? So I was not satisfied!

From that day onward, for every birthday, I made the cake of my own. Many times, it was just a simple chocolate cake, as I did not have any idea of icing a cake during those days. But, still it made my daughters very happy. Many people asked me, why don't you get colorful iced cakes for your daughters! Yes, I could have went to a bakery shop and get the best cake from there; but to me, it was very much superficial. Baking a cake - is a project and it not only involves the basic ingredients, but also requires a lot of sincerity, dedication and passion. By baking the birthday cakes every year, I wanted to satisfy my desire of being more sincere and dedicated for my family-members. However, this is extremely personal view, and friends, no offence... please!!

This year, I planned to make a properly iced cake for her and I really made a plan much ahead of the day. Although it was a black forest cake, but I made it little bit unique, by drawing mehendi designs on top, using melted chocolate. In fact, the main reason behind this planning was that my daughter loves to wear mehendi on her hands. Her school does not permit to have mehendi-dyed hands, so many times, she does temporary mehendi drawings on her palms, using brown colored sketch pens. And I knew that she is going to love this cake, even before baking it!!

I baked the chocolate sponge cake, a day before the birthday. Because, you have to give some time to cool the cake in room temperature. You also need the other ingredients ready by your side. One of the most important ingredients is fresh cream icing. 

To prepare the fresh cream icing, I used -
BlueBird whipping powder - 2 packs

The whipping method is clearly mentioned at the back of the pack. Follow that carefully, to prepare a stiff peak whipping cream. Keep it inside refrigerator, until you are using it for icing. 

Other than the whipping cream, you will also need whole de-seeded cherries. Tinned cherries will also do. My luck was not that good, I could manage some dried cherries from the dry fruit section of the grocery store. But that's fine, I took 1 cup of dried cherries and let them soak into 1/2 cup of warm water. Cherries became fresh and I got the cherry syrup, as well. 

A black forest, is not a black forest, unless you use rum to soak the cake. But I did not have rum, instead I used 2 tablespoons of red wine, and it was quite good. I added that red wine to the cherry syrup.

Finally I had to prepare the melted chocolate for piping the mehendi design. I used the normal double-boiler method to melt 2 dark milk chocolates (medium sized). Once the chocolate started melting, I removed the glass bowl from the double boiler and kept it aside to cool down at room temperature.

Everything was ready, and it was the time to assemble. 

Step 1:
Cut the cake horizontally in 2 parts. If you want, you can make 3 layers of cake, too.


Step 2:
Place one layer on top of a board, and soak with the cherry syrup. Add cream icing and spread nicely on top. Sprinkle cherries all over.


Step 3:
Cover the icing with the other half of the cake. Complete icing on top and sides. Place the iced cake inside the refrigerator for 30-60 minutes, before you start the chocolate design.

Step 4:
Use a piping bag to fill with melted chocolate. Make a small hole in the corner. Be careful, a little larger hole will make the design a mess. Also you will have better control over the chocolate flow, when you have a small hole. You can do your choice of design.


Here is a simple video of making the design on top of the cake. My younger daughter has recorded it in a mobile phone camera and then she has edited it. The editing software was a downloaded version, so the promo text is showing up in between. But this is her genuine effort to make me happy and so I am putting it in my blog.


I wanted to make her happy and she wanted to make me - it was a sincere emotion from both the sides. As a result, the cake came out so nice and the video, came out to be a surprise for all of us!

Enjoy!!!

Monday 30 March 2015

A Chocolate Sponge Cake and More!

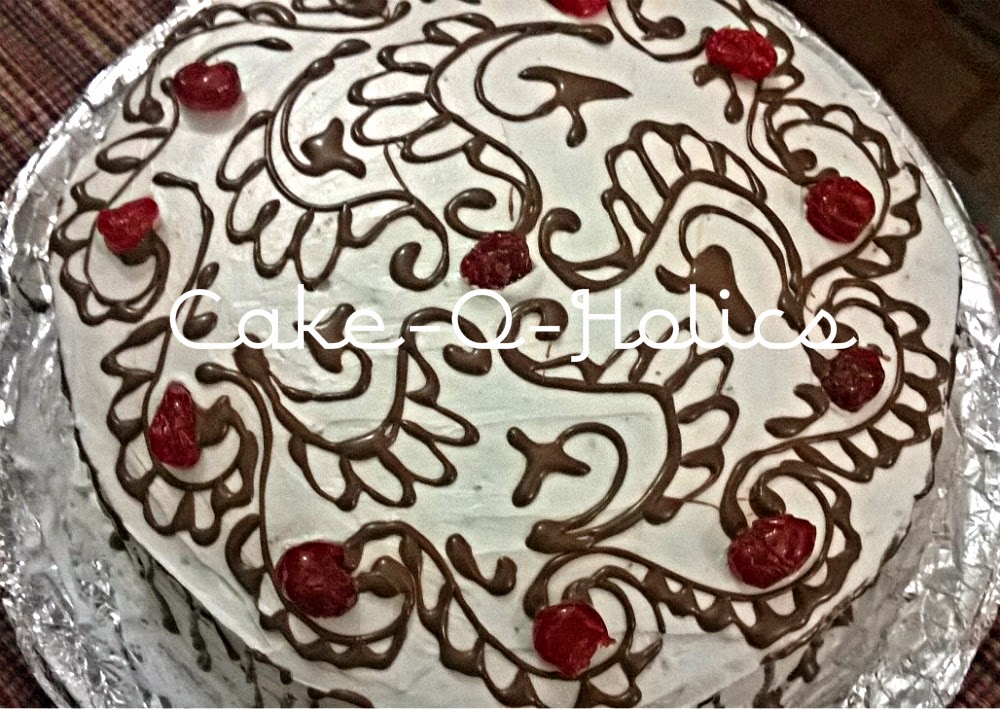
It was the birthday of my younger daughter and this time, I made a Black Forest cake for her. A Black Forest cake is a common favorite for many - the soft and smooth texture, a tinge of rum taste mixed with cherry sweetness, along with the blend of chocolate flavor - makes it truly irresistible. I wanted to make it little unique, with some Mehendi design on it and at the end, it came out to be the show-stopper for the evening!


Making a Black Forest is little-bit lengthy process. Till now I have posted only the basic cake recipes. Now to make something exclusive and different, you have to spend some more time on these basic cakes. There is no way to shorten this procedure, dear! Basically you can divide the process in two parts. First you prepare the cake in the first half, allow it to cool and then in the second half, you do the assembling and decoration. The second half takes more time than the first half, so you should plan accordingly. I've planned ahead and so baked the cake in previous evening and then next day, I did the remaining part. 

Since the texture of a Black Forest cake is more  soft and spongy, you have to use a chocolate sponge cake for that. So, I'll tell you the first part of the process - which is baking the chocolate sponge cake; the assembling, will be described in my next blog.

The chocolate sponge cake I baked this time, is a oil-free one. Since I had to use lot of cream to decorate the cake, I wanted to be on the healthier side, as much as possible.

The dry ingredients, I used -

Flour or maida - 1/2 cup + 1 tablespoon
Cocoa powder - 1/4 cup
Powdered sugar - 1 cup - 1 tablespoon
Baking powder - 1 teaspoon
Soda-bi-carbonate - a pinch

Note - You've to be very particular about the measurement. The spongy effect will not come properly, if you don't measure the ingredients carefully. For example, 1/2 cup + 1 tablespoon means take 1 tablespoon more flour on top of 1/2 cup flour; similarly 1 cup - 1 tablespoon means measure 1 cup sugar and remove 1 tablespoon sugar from that 1 cup and then use it.

The liquid ingredients are -
Eggs - 4 large-sized
Hot water - 1 1/2 tablespoon
Vanilla essence - 1 1/2 teaspoon

Take a big bowl, to sieve in flour, cocoa powder, baking powder and soda-bi-carbonate. Blend the ingredients together using a dry wooden spatula and keep it aside.

In another big bowl, crack the eggs and add sugar. You should sieve in the sugar, if lumpy. Use the electric beater and beat the mixture for 4-5 minutes. The color of the mixture will change from yellow to off-white, as you beat. 

Meanwhile, boil some water in a saucepan. Gradually add 1 1/2 tablespoons of hot water in the mixture, while you continue the beating. The water should be added in drops, when the electric beater is on. The addition on hot water will make the batter light and fluffy. Finally add the vanilla essence and give a final beating.

Set the oven in preheat mode at 180C temperature. Also grease and dust your cake pan and keep it aside.

Remove the electric beater from the egg mixture and use the wooden spatula to fold in the flour. Take 2 tablespoons of flour at a time, sprinkle on the egg mixture and fold in. The folding in process should be done in such a way that more air is sealed within the batter. This trapped air will make the cake spongy and soft. So this part is extremely important.

Pour the batter into the cake pan and place inside the oven for baking. The baking should be done for 25-30 minutes at 180C temperature.

When the cake is ready, it will shrink a little bit from the sides of the cake pan. Also if you touch the top, you will be able to feel the sponge effect. Now, you should do the knife test to check the doneness. 

Remove the cake from oven and let it rest in the pan for sometime (5-10 minutes). Once it reaches room temperature, wrap it with a cling wrap and place it inside the refrigerator. 


You can also use this recipe to prepare a simple chocolate sponge cake. Add icing on top as per your choice, serve as a dessert or serve as it is, without any icing, as an afternoon snacks.

The assembling part of black forest... to be continued...

Thursday 26 March 2015

A Basic Vanilla Cake with Choco Cream Frosting

One of my dearest friends, has commented recently in my FB page - "Aren't u being obsessed with cakes..."? She is my long-time school friend, with whom I got re-connected after almost 30 years. Within this 30 years, I have grown through so much of changes, developed new passions and erased few from my memory. So definitely I am not the same person, as I was in my girly days! But one thing I enjoyed in her comment, is that I could make her think that I am obsessed and I could reach to that limit of being passionate about baking. Being a jack-of-all person, this is a real achievement for me. Thank you so much, my dear friend, for your compliment - as it gave a new dimension in me. My philosophy is - life is multi-dimensional and explore as much as you can!! :)

Well, it's not a time to discuss philosophy!! So, let me get back to my main topic...

Usually a vanilla cake is not so adorable for my kids. In my weekend baking time, they will keep on asking - "Mom, what are you baking this weekend?" And when I answer, it's a vanilla cake - they will immediately make unhappy faces... :( :(... No, they are not interested in plain and simple vanilla cake. So very rarely I bake vanilla cakes and even when I do, I have to make an elaborate icing plan for that... so that my princesses are at least not unhappy... :)

This time I wanted to test the basic Vanilla Cake recipe, which I posted here. Since I haven't used this recipe for quite some time, I was kind of unsure - how it will turn out. But, it turned out real good and now I can confirm you that this recipe is tried and tested. It came out perfect, fluffy and soft. 

Even the bottom part of the cake was so nicely done that it just slid easily from the cake pan, without much effort.

The icing part was again simple. This time I used -

BlueBird Whipping Powder - 1 pack (I wanted to keep it simple, you can use 2 packs if you want thick icing on top and in between)
Cocoa Powder - 2 tablespoons
Choco Chips - a handful

The whipping process is mentioned in the back of the packet, follow that. If you want to make the icing little stiff, then you can reduce the water quantity than it is mentioned. This time, I wanted to make the icing little tight, so I used less quantity of chilled water. After whipping through the mixture for 10 minutes (given short intervals) I added the cocoa powder. Using a plastic spatula, I blended the cocoa powder into the whipping cream. After blending, you can do another quick whipping for couple of minutes more.

Spread this chocolate cream on top of the cake, nicely and evenly. Sprinkle the choco chips on top. Keep the cake inside refrigerator for 30 minutes, before serving. This will help the icing to set nicely.

While serving you can drizzle some chocolate sauce on top, for added flavor.

I'm loving it, now!!!